
How To Make Lantern Shades
| For instructions for making lantern bases, click here. |
| Many participants in the
Peace Lantern Ceremony enjoy decorating lantern-shades at the site, along
with hundreds of other participants. We will provide materials and workspace
for that purpose. However, some people like to decorate their own shades
ahead-of-time; and others are helping us out by preparing multiple lantern
shades that others can decorate at the site. (If you will be bringing
extra lantern shades made per these instructions, please let us know
how many you'll bring.) For those who wish to decorate their shades
at home and those who will bring extra shades for others to decorate,
these instructions will ensure that your shade will fit atop our lantern
bases and will be acceptable for floating on the water at Aquatic Park.
|
 |
Begin with two sheets of 8.5" x 11" (standard U.S. letter size) paper. Ideal paper is plain office paper, white or light colors. The paper needs to be heavy enough so that it won't fall apart if it gets wet, but light enough to allow the lantern candle to shine through it. (In these illustrations, we show two different colors to make the instructions clearer; generally, a given lantern shade is made of two sheets of the same color.)
Fold each sheet in the center, so that the fold is 8.5" long and you produce two panels per sheet, each 8.5" x 5.5".
|
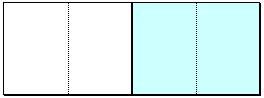 |
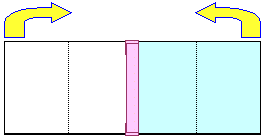
Open up the sheets again and place them, with the folds bending downward, next to each other along the 8.5" edge, touching but not overlapping. (This is important, because if you overlap the sheets, the resulting shade will be too small to fit our lantern bases.) |
|
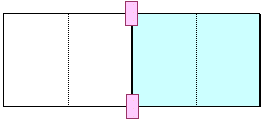
Tape the two sheets together on each end with two strips of clear (“Scotch”) tape, ideally 3/4" wide by about 2" long, with about half of each strip sticking out past the ends of the paper. |
|
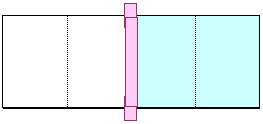
Place another strip of clear tape about 8" long so it firmly attaches the two sheets together. |
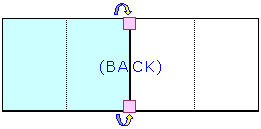 |
Fold over the tape sticking out on each end so that it affixes the other side of the paper. |
 |
Bring the two outer 8.5" edges together, and repeat the taping process to affix those edges together. |
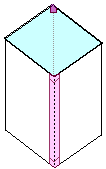 |
The result will be a box 8.5" high with each face 5.5" wide, taped along two outer edges, with a bit of tape overlapping into the inside at each taped end. Now decorate the lantern shade with pictures, words, cut-outs, whatever you fancy. You might write or illustrate your wishes for world peace, pictures or words in remembrance of departed loved ones, or other images or words that reflect the spirit of the occasion. Important: Make sure anything you attach to the paper is very firmly attached and won't fall off if it is jostled or becomes wet; and that cut-outs don't weaken the shade to the point that it can easily tear, or let a lot of air through at the bottom 2-3" (if it's windy, your lantern candle could blow out). We'll be supplying bases for the lanterns (which we'll collect afterwards for use in future years). Some people may want to make their own lantern bases. If you do that, make sure your base will float; won't capsize, catch fire from the candle, or come apart; and doesn't have anything that might fall off in the water or cause pollution. We reserve the right to decline to float lanterns or shades as necessary to protect the ecology of the lagoon and the integrity of the event. If you can make and bring extra shades to the event, please fill out our volunteer form letting us know how many you'll bring.
|
Questions? Suggestions? Comments? Write to:
info-AT-peacelanterns.org
(change "-AT-" to "@")
Lantern Ceremony Main Page | Map | Transit Info | Volunteer!
